Saturday, April 28, 2012

Kitchen Sink

The new faucet is the last item in our kitchen that needs to be done, so that we can get back to the real world. Yes, the kitchen does need other work (like artwork and blinds), but since those aren't in my way when I'm trying to cook, I'm not as concerned.

This is our old sink.


It's not terrible. But it's a little bit boring. 

We picked this up at the store, not only for the long, graceful neck of the faucet, but because it has a pull-down spray. I'm so excited!!!! I haven't had one of those since I lived in New York!!!


Hopefully we'll install it tomorrow or this weekend! 


Wednesday, April 25, 2012

Lara Bars

Have you tried these?

Tuesday, April 24, 2012

Kitchen Paint Colors

Given the hatred we had of our old kitchen color (spearmint lime, anyone?), we bought samples this time, and painted them throughout the kitchen. We're planning to look at them throughout the day, and decide which one we like best in all lights of the day


Honestly....I don't really like any of them. The husband likes the green one (you can only really see it on the white wall).
So I really don't like any of them, I'm going to comprise and say that we'll go with the color he likes. Hopefully we'll get this painted tomorrow night (today is our anniversary so we're going out to dinner!) 


Monday, April 23, 2012

Kitchen Progress, Current Before and After

This is where we started:
Cabinet Transformations

This is where we are today. The crown is installed, cabinets are painted, the knobs/pulls are installed, and the doors have been put back on!

Rustoleum Cabinet Transformations
All that is really left to do, before we can say the kitchen in completed, is to paint and replace the kitchen faucet! Well, and a DEEP cleaning. There is a layer of drywall throughout the kitchen... gross! And, of course, the stove will eventually need to be replaced. I just can't see replacing a perfectly good (and working) oven, just because of the color.

Friday, April 20, 2012

First Knobs are up (and of course there are issues)

I started drilling holes for the knobs today, with my handy template. Last night, Alex and I agreed on a proper place for the knobs to go, on both the drawers and doors.

So far, I've encountered a couple of problems:
1 - the screws included are too short to go through our drawer fronts (no big deal, just another trip to the hardware store)
2 - We never marked the holes for the knobs on the smaller doors (only the pulls). So I ended up using a lower hole for the knobs. I realized this when I went to go to a pull on a lower door and had to use different holes than planned. Not a big deal, Alex just really liked pulls/knobs higher up on the doors. I haven't told him this yet, and I am considering using the originally chosen holes for the rest of the upper pulls (I don't think anyone would notice that they are slightly different, since overall, they would look the same).
3 - The real issue -- we didn't account for where the door hits the base of the cabinets, so, the screw behind the knob is hitting the cabinets. Over time, this can cause a gauge in the cabinets and it sticks out from the base cabinet more than it should.

Right now, for problem #3, I put a felt back over the back of the screw, which helps damper that effect. Unfortunately, the cabinets are still sticking out slightly from the base, but I don't think anyone would ever notice that. But for now, I'm waiting for Alex to get home from work before I drill any more (If we have to go back, wood fill, repaint and then redrill, I want to minimize the amount of rework).

But this is one of the sets that are up:
Rustoleum Cabinet Transformations

We're using the small knobs on the smaller doors/drawers and the pulls on the rest of the larger doors. Hopefully, this will give is some differentiation and some interest!

Thursday, April 19, 2012

Kitchen Update!

The final coat of top coat just went on! That means we can start drilling the holes for the cabinet pulls and put those up. I'm very excited for this project to be done!


Monday, April 16, 2012

Real Food

Alex and I are gained weight since we got married. Partly, I'm sure, due to getting older, but some of it is that we eat out a lot and don't eat very healthy (and dislike exercising!). We decided to start eating organic whenever possible and "Real Food." Real Food is  defined as food as close to nature as possible, or with as little ingredients are possible. I'm not a fan of wasting food, so we're eating through the food that is currently in the fridge/freezer/pantry before it goes bad.  

We were inspired by this blog: http://www.100daysofrealfood.com/ This woman is amazing! Hopefully, we'll be able to cut out all the preservatives and pesticides that are currently in our diets -- and maybe even plant a garden other than just tomato plants.

Hopefully, we will to continue to enjoy good health, and be in even better health when eating better food. We're also looking into buying bikes, so we can take them on some trails (inside of hiking, the only current exercise we do!). We're torn between mountain bikes and hybrid bikes; I think we'll end up with a lower end mountain bike simply because they are cheaper!

Saturday, April 14, 2012

Anniversary Trip Plans

Last year, for our first wedding anniversary, Alex planned a trip. It was a total surprise for me - Alex planned it all, booked the hotels, and even printed a step-by-step map for the surprise element. It was great! We went to Hearst Castle and then stayed at the Madonna Inn. If you've never heard of it, check it out. It's fantastically gaudy! 
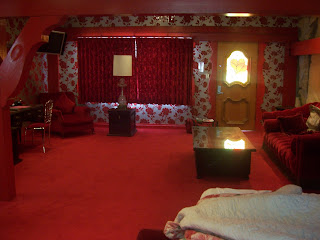
We stayed in the "Hearts and Flowers" room. Check out this amazing room! The wallpaper was even textured. The shower/sinks were made out of rocks excavated when the Inn was built. 
Hearts and Flowers
This year is my turn to plan the trip. I've decided; Zion National Park in Utah, with a stopover in Bryce Canyon for a night, and then perhaps crashing in Vegas (halfway home) for the night before finally heading home. It's a long drive, but who knows how long we'll live out West, and I want to check out these landmarks while we can! I'm excited and need to start booking hotel rooms and all that! I didn't keep a surprise as planned though, because I wanted to make sure Alex was on board with that much driving!

Friday, April 13, 2012

Ana White Headboard

Ana White is my hero. I stumbled across her blog months ago, and am simply amazed at her skills. If I had more tools and more time, I think I would be so inspired by her blogs and the plans she post to build something from every room in our house.

When Alex was recently out of town for work, I decided to finally build us a headboard. We've had our temperpedic bed (which we LOVE) for over two years now, and we've never had a headboard for it.

These were the plans I used. I didn't take any photos as I went along building it (unfortunately).
http://ana-white.com/2010/03/plans-reclaimed-wood-look-headboard-king-size.html

We went to the store and bought a whole bunch of wood (the wood in Ana's plans). We didn't use the cheapest wood (furring strips) but we used the next cheapest option (plain pine). We sent about an hour in the store, picking out straight boards with the fewest knots we could fine.

So, set with nails, the handy borrow miter saw, nail glue and a hammer, I made this, following Ana's plans (for a California King):

Ana White
It is coated with Minwax Polyshades in Bombay Mahongny. I'm not a huge fan of the shininess, so I think we'll end up repainting it in a comple of years. Polyshades is also very difficult to work with, so I wouldn't recommend using it. If I built it again, I would use regular stain or paint.
Ana White
Here is the finished project! The quilt was a wedding present from my mother-in-law!

Thursday, April 12, 2012

Break from the Kitchen -- Window Seats!

Ever since we bought this house, I've wanted to build window seats in my office. There are two dormer windows that just scream for a window seat/toy box.
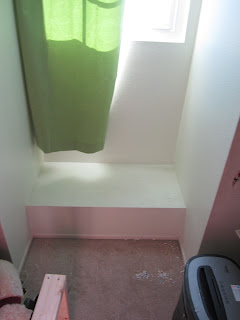
Measuring for the base in Window Seat #1

 Current Window Seat #2 storage... not very organized and looks very messy!

 Building the frame out of 2x4s. 2x4s are nailed together and nailed into the wall studs. I also used an extra metal support to attach the front center piece.
 I cut a piece of plywood to fit the front, lining up with the wall below (I'm replacing the baseboards, that's why they're missing!)
 View from the top -- you can see the metal brace from in here.
 I added a piece of wood in the back to attach the hinge to.
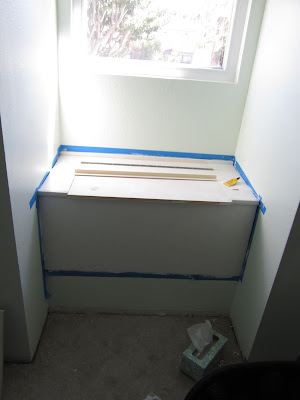
 I cut two pieces for the sides that were also nailed in. Then, for the lift up door piece, I used a piece of 1x10 that was cut to size. It slightly overlaps the edge of the box for a lip to open the box and stay closed. This picture shows the box after I used nail filler and primed.
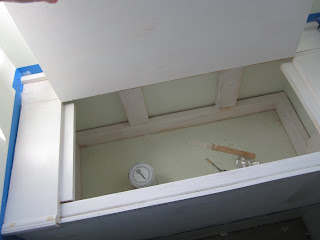
 The inside of the box, with the supports.
 Adding trim pieces.

Caulked and trimmed! I used leftover trim (old baseboard trim) that was in the garage to make a picture frame around the exterior of the front of the box. I caulked all the pieces to make it look seamless, and painted the interior and exterior pure white. I then painted the front of box with caulkboard paint (Thanks, Martha Stewart!). So easy and I had all the makings for it in the garage!
 Window Seat #1 and #2, all done! The baseboard still needs to be nailed in, and I hemmed the curtains to match the new height. It looks so much cleaner with all our extra pillows and blankets tucked away!


Tuesday, April 10, 2012

Kitchen Paint Color

We're trying to decide what color to paint our kitchen. Now that the cabinets are brown, the hideous spearmint green color is even worse looking than it ever was (we loved it on the paint sample, but it looked awful once on the walls. We were just too lazy to change it before we did the rest of the kitchen). 

I'm slightly in love with the trendy gray color, but I don't think that will look right with the brown cabinets. I think we will either have to go for another light green color or cream. When we originally purchased the house, the entire house was painted a gross poop brown color. I'll need to dig out an old photo of it. 

I'm leaning towards a Swiss Coffee color or a Sage Green color. Alex is afraid the Sage Green color will be too dark. We do have an odd shaped kitchen (cave-like), so we do want to make sure our kitchen is light and bright, but also matching the rest of the house. I also like a very light gray/blue color. It's just slightly non-white. We'll be testing samples soon, so I'll try to remember to upload a photo. 

Sunday, April 8, 2012

Cabinet Hardware

I found a bunch of these cabinet knobs on clearance at target the other day. I'm not sure if I 100% love them for the kitchen, but at less than $0.75/knob and pull, and they are satin nickel, I just might learn to love them.


http://www.target.com/p/Target-Home-Scoop-Pull-6-Pack-Satin-Nickel/-/A-13332204
http://www.target.com/p/Target-Home-Scoop-Knob-10-Pack-Satin-Nickel/-/A-13332200

I'm thinking that we'll put the pulls on the bigger cabinets, vertically, as well as the bigger drawers. I'd use the smaller knobs on the two small drawers as well as the small cabinet doors. We need to make the decision soon so that we can drill all the holes and get those cabinets up! We also bought bumpers so that the cabinets won't stick with the paint while it dries / quieter closing. We're using a template to drill the holes to make the process much faster!
http://www.homedepot.com/h_d1/N-5yc1v/R-202200665/h_d2/ProductDisplay?catalogId=10053&langId=-1&keyword=cabinet+hole+template&storeId=10051


About a year ago, we bought a bunch of door dampers (they catch the door so that it doesn't slam, and closes silently) on clearance at IKEA. I think they were discontinuing them. They are similar to this: http://www.ikea.com/us/en/catalog/products/60159704/

We won't be able to install them on all the cabinets, because of the layout of the cabinets, but we should be able to use them on all the big upper cabinets. I think we paid $0.99 for an 8-pack, quite a deal!